 how-to
How to Light Abstract Art Sculptures at Home
Table of Contents
- Why Lighting Makes or Breaks an Abstract Sculpture
- What You'll Need Before You Start
- Step 1: Choose the Best Lighting for Sculptures
- Step 2: Position the Light at the Right Angle and Height
- Step 3: How to Reduce Glare on Artwork and Sculptures
- Step 4: Shape Shadows to Highlight Texture and Form
- Step 5: Lighting for Resin Sculptures and Glossy Finishes
- Sculpture Lighting Ideas for Home, Room by Room
- Protecting Sculpture Materials from Light and Heat
- Common Mistakes to Avoid
- Frequently Asked Questions
Last Updated: October 18, 2026
Why Lighting Makes or Breaks an Abstract Sculpture
A sculpture sitting in the wrong light looks like clutter. The same piece under the right beam becomes the thing guests ask about. That's the whole game with how to light abstract art sculptures at home: light doesn't just make a piece visible, it decides whether the form, texture, and finish actually read.
Here's the part most guides miss. Flat wall art mostly needs even wash. A three-dimensional piece needs direction. You're lighting shape, not a surface.
At Your Decor Essentials, we style abstract sculptures and resin accents for rooms every day, and the pattern is consistent. Pieces that get deliberate light look twice as expensive as they are. Pieces that get overhead-only light disappear into the wall behind them.
Below, we'll walk through the exact steps: fixture choice, angle, glare control, and shadow shaping. The payoff is a sculpture that looks intentional from every seat in the room.
What You'll Need Before You Start
Gather these before you touch a single fixture. A little prep saves a lot of repositioning later.
- One or two adjustable accent lights. Small spots or picture lights with a tiltable head work best.
- LED bulbs with a high color rendering score. Look for a CRI of 90 or higher on the box.
- A tape measure. You'll want it for height and distance.
- Painter's tape. Mark spots on the floor before you commit.
- A step stool. Safe reach beats a wobbly chair.
- A helper. One person holds the light, one steps back and judges.
Skip anything that runs hot to the touch. More on that in the materials section.
Step 1: Choose the Best Lighting for Sculptures
The best lighting for sculptures is a directional LED accent fixture with an adjustable aim, a narrow-to-medium beam, and a color rendering score of 90 or higher. But "accent fixture" is a category, not a product. The fixture type you choose determines where it can go, how much control you get, and whether you can install it without an electrician.
Fixture Types and Where They Work
- Track lighting: The most flexible option for a dedicated display wall or a room with multiple sculptures. Heads slide and rotate along the rail, so you can re-aim without moving the fixture. Best when you have a ceiling junction or are willing to add one. Trade-off: visible hardware and a slightly industrial look.
- Picture lights: Slim fixtures that mount directly to the wall above the piece. Good for a single sculpture on a console or in a niche. Trade-off: limited reach and aim; they work best when the piece sits close to the wall.
- Recessed adjustable spots: Clean look, strong directional control, and out of the way. Best for permanent installations where you can cut into the ceiling. Trade-off: installation cost and less flexibility if you rearrange furniture.
- Floor lamps with adjustable heads: No installation, movable, and good for tall or floor-standing sculptures. Trade-off: takes up floor space and can be knocked over in high-traffic areas.
- Portable battery or plug-in spots: The easiest starting point for renters or for testing a look before committing. Trade-off: lower output and shorter run times on battery models.
Beam Angle and Distance
Beam angle controls how much of the sculpture is lit and how sharp the shadow edge looks. A narrow beam (around 15 to 25 degrees) creates a tight pool of light and strong contrast, which suits small pieces and dramatic looks. A medium beam (around 25 to 40 degrees) covers a larger sculpture or a group of small pieces without hot spots. A wide flood (40 degrees and up) is rarely useful for a single sculpture because it spills onto the wall and floor.
Distance and beam angle work together. A narrow beam from far away covers the same area as a wider beam from close up, but the farther fixture throws a harder shadow and loses intensity. Start with the fixture two to three feet from the piece and adjust from there.
LED, Halogen, or Incandescent
LED wins for most homes. It runs cool, dims smoothly, and holds its color over time. Halogen gives a warm, familiar glow but runs hot and uses more energy. Incandescent is the same story with a shorter lifespan. For a piece you plan to keep lit for hours, LED is the practical pick.
Color Temperature and Color Rendering
Color temperature is how warm or cool a light looks, measured in kelvin. Color rendering is how faithfully a light shows true colors, scored as CRI.
- 2700K to 3000K: warm light, cozy, best for living rooms and bedrooms
- 3500K to 4000K: neutral white, best for galleries and hallways
- CRI 90+: the threshold where colors stop looking muddy
Warm light flatters wood, bronze, and amber resin. Cooler white light makes glass, chrome, and pale plaster look crisp. Pick the temperature that matches the room, not just the piece.
Step 2: Position the Light at the Right Angle and Height
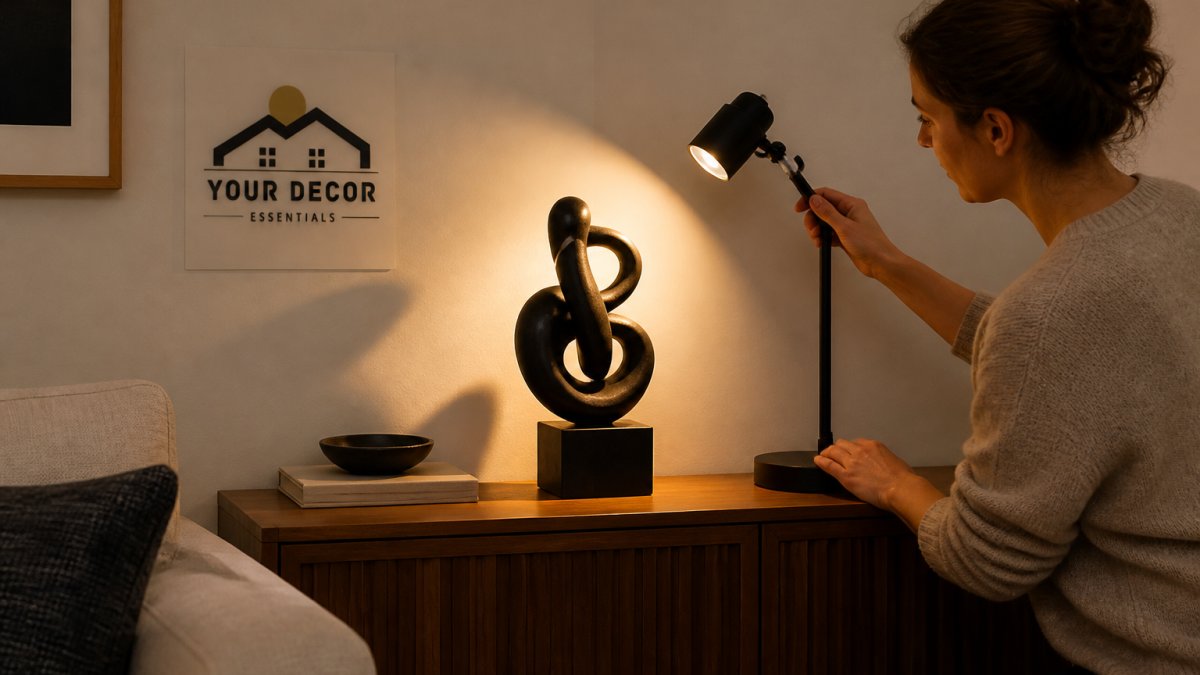
The classic starting point is a 30-degree angle: aim the beam down at roughly 30 degrees from vertical, from a fixture placed slightly in front of the piece. This angle rakes light across the surface, so texture and edges catch it. But the 30-degree rule is a starting point, not a law. The right position depends on the sculpture's height, depth, and the seat you view it from.
Measure Before You Mount
- Mark the viewer's position. Put a piece of painter's tape on the floor where you most often stand or sit to look at the piece. Every angle decision should be tested from that spot.
- Measure the sculpture's height and depth. Note the top of the piece and how far it projects from the wall or pedestal. A deep piece needs the light farther forward so the front face is not shadowed by its own overhang.
- Calculate the beam footprint. Multiply the distance from fixture to sculpture by the beam angle in radians (or use the fixture's published beam-spread chart). A 25-degree beam at three feet covers roughly a 16-inch circle; at five feet it covers about 27 inches. Match the footprint to the sculpture's width so light does not spill onto the wall.
- Set the height. For a piece on a console or pedestal, mount the light above the top of the sculpture and aim down. For a tall floor sculpture, a low grazing light aimed upward reads dramatic but flattens the top. A fixture at or slightly above the piece's midpoint gives the most natural form reading.
Test From the Viewer's Seat
Turn the light on and sit or stand at the tape mark. If the shadow falls straight behind the sculpture, move the light to one side. If the front face goes dark, move the fixture forward. If the top washes out, lower the aim. Make one change at a time and re-check from the same spot.
Adjust for Sculpture Shape
- Tall and narrow: aim from the side rather than straight on so the full height catches light.
- Wide and low: use a wider beam or two fixtures spaced along the width to avoid a bright center and dark ends.
- Open or negative-space forms: light through the gaps, not just the solid faces, so the empty spaces read as part of the design.
- Deep relief or textured surfaces: a lower, more raking angle (closer to 45 degrees from vertical) exaggerates texture; a higher angle softens it.
Step 3: How to Reduce Glare on Artwork and Sculptures
To reduce glare on artwork, move the light source out of the viewer's line of sight and change the angle until reflections bounce away from where people stand. Glare is a reflection problem, not a brightness problem.
Try these fixes in order:
- Raise or lower the fixture. A small height change often kills the hotspot.
- Shift the angle. Rotate the head a few degrees left or right.
- Narrow the beam. A tighter beam hits less surface and creates fewer reflections.
- Add a diffuser or hood. These soften the beam edge and block stray light.
- Dim the fixture. Less intensity means less bounce.
Glossy finishes are the usual culprits. If you can see the bulb's reflection from your favorite chair, so can everyone else.
Step 4: Shape Shadows to Highlight Texture and Form
Shadows aren't a defect. They're the tool that makes a three-dimensional piece read as three-dimensional.
A single directional light creates a clear light side and shadow side. That contrast is what your eye uses to judge depth. Two lights aimed from opposite sides cancel each other out and flatten the piece.
For a dramatic look, use one tight spot from above and to the side. For a softer look, add a second, dimmer fill light from the opposite side at low intensity. Keep the main light clearly stronger than the fill so the form still reads.
Aim for a brightness ratio where the shadow side stays visible but clearly darker. If the shadow side goes black, add a touch of ambient light from the room. If both sides look identical, you've overfilled.
Step 5: Lighting for Resin Sculptures and Glossy Finishes
Lighting for resin sculptures needs extra care because resin finishes range from matte to mirror-gloss. Glossy resin throws reflections and hotspots that matte pieces never show.
- Glossy resin: use a wider beam from farther back, and keep the fixture out of the reflection path
- Matte resin: a tighter beam works well and pulls out surface detail
- Translucent resin: backlight or sidelight it and the piece glows from within
- Mixed finishes: light the matte side, and let the glossy side catch ambient light
Translucent pieces are the fun ones. A small light placed behind and below makes the whole sculpture come alive. Just keep heat away from the piece, which we'll cover next.
Sculpture Lighting Ideas for Home, Room by Room
Sculpture lighting ideas for home should follow how each room gets used, not a single formula.
- Living room: one warm accent spot on the main piece, plus dim ambient light. Keep the spot on a dimmer for movie nights.
- Entryway: a narrow beam from above makes a console sculpture the first thing guests see.
- Bedroom: soft, low-intensity light at 2700K. Skip anything that throws a hard shadow across the bed.
- Home office: neutral 3500K light keeps colors accurate during the day and looks sharp on video calls.
- Hallway or stair landing: a picture light or slim spot mounted high, aimed down at the piece.
One more idea: group small sculptures in threes and light them from one shared fixture. It reads as a single display instead of scattered objects.
Protecting Sculpture Materials from Light and Heat
Light can fade finishes and heat can warp or crack certain materials. Resin, painted surfaces, and some plastics are the most sensitive.
- Keep heat away. Use LED fixtures, which run cooler than halogen or incandescent.
- Mind the distance. Don't park a hot fixture inches from the surface.
- Limit direct sun. Strong daylight fades finishes over time. Use curtains or UV-filtering film on nearby windows.
- Rotate pieces. If a piece sits in bright sun, move it every few months.
- Check for warmth. After an hour of use, touch the fixture housing. If it's hot, move it back.
A quick note on sunlight: the National Park Service guidance on light exposure for collections explains how light damages materials over time, and the same logic applies to decor at home.
Common Mistakes to Avoid
Most lighting problems come from a short list of repeat offenders.
- Overhead-only lighting. A ceiling fixture alone flattens every curve. Add a directional accent light.
- Two equal lights from opposite sides. They cancel out shadows and kill the form.
- Bulbs with low color rendering. Colors look dull and muddy. Stick to CRI 90+.
- Lighting the wall, not the piece. Aim at the sculpture, not the space behind it.
- Ignoring the viewer's position. Test glare from where people actually sit.
- Skipping the dimmer. Fixed brightness is the fastest way to make a room feel harsh.
Lighting a sculpture well takes one afternoon and a couple of small adjustments. The hard part is choosing a piece worth lighting.
That's where we come in. Your Decor Essentials curates abstract sculptures and resin accents designed to be the focal point of a room, alongside functional lighting that makes styling simple. Our collection helps you build a look that feels personal, not mass-produced. Browse our abstract sculptures and lighting, and give your space the piece, and the glow, it deserves.
Frequently Asked Questions
What is the best way to light a sculpture at home?
Start with an adjustable LED accent light positioned above and slightly to one side of the sculpture, aimed at about a 30-degree angle. Use a warm-to-neutral color temperature around 2700K to 3000K and a high color rendering index so the sculpture's true colors show. Keep the beam narrow enough to avoid spill on the wall, and add a second light only if you need to soften harsh shadows. This combination gives you control over direction, intensity, and glare without washing out the surface detail.
How do you reduce glare when lighting a sculpture?
Glare comes from light hitting a glossy surface at the wrong angle and bouncing into your eyes. Move the fixture higher or further to the side so the reflection lands away from your viewing position, and swap a tight spot for a wider beam or a diffused lens. For very shiny resin or polished pieces, angle the light so it grazes the surface rather than hitting it head-on. A dimmer also helps, since lower intensity reduces the strength of reflections.
What type of light works best for resin sculptures?
Resin sculptures benefit from LED lighting because LEDs run cooler than halogen or incandescent bulbs and won't heat the surface. Choose a high-CRI LED in the 2700K to 3000K range for warm, natural color, and avoid direct sunlight, which can yellow or degrade resin over time. A diffused accent light placed above and slightly to the side brings out translucency and depth without creating hotspots on the glossy finish.
Can you use a picture light to illuminate a sculpture?
A picture light can work for a sculpture displayed on a shelf or against a wall, but it isn't ideal. Picture lights are designed to wash flat art evenly, so they tend to flatten a three-dimensional piece and can cast awkward shadows. An adjustable accent light or track fixture gives you the angle control a sculpture needs. If you do use a picture light, pick one with a swivel head so you can aim it down and to the side rather than straight at the piece.