 how-to
Style Small Art Prints on Narrow Shelves: A Visual Guide
Last Updated: October 22, 2026
Quick Summary
Small art prints narrow shelves work best when you lean frames at 15-20 degrees, layer pieces at different angles and heights, and match frame sizes to your shelf's usable depth. This creates visual depth and prevents clutter on shallow surfaces.
- Measure your shelf's usable depth before buying frames, accounting for the frame's footprint when leaning at your intended angle
- Use the leaning technique at 15-20 degrees to create depth and visual interest without requiring more physical space
- Limit displays to 2-3 key pieces on shorter shelves and create distinct zones on longer shelves to avoid overcrowding
- Layer frames by overlapping them 1-2 inches horizontally and at different angles rather than stacking them vertically
- Stabilize leaning frames with felt pads at the base and removable putty or adhesive dots at the top contact points
Table of Contents
- Why Narrow Shelves Need a Different Approach to Small Art Prints
- How to Decorate a Narrow Shelf: The Foundation
- Choosing the Right Frame and Print Size for Your Shelf Depth
- How to Display Small Art Prints Without Creating Visual Clutter
- Layering Framed Art on Shelves for Visual Interest
- Picture Ledge Styling Ideas: Balancing Art with Objects
- Using Height Variation and Shapes to Add Visual Balance
- Keeping Your Narrow Shelf Display Stable and Safe
- Step-by-Step Layout Examples for Different Shelf Lengths
- Frequently Asked Questions
Why Narrow Shelves Need a Different Approach to Small Art Prints
Narrow shelves demand a completely different strategy than standard display surfaces. When you're working with limited depth, the usual styling rules fall apart.
Most people treat narrow shelves like they would a standard bookshelf. They stand things upright, line them up, and call it done. The real challenge is using small art prints narrow shelves to create depth and balance when space is tight.
Your Decor Essentials empowers homeowners to effortlessly introduce visual interest and enhance their living spaces, transforming them into more comfortable and beautifully styled environments that truly reflect their individual taste. The key is understanding that narrow depth changes everything about how art reads visually.
Think of your narrow shelf as a stage with limited wings. Every element needs purpose. Every inch of depth matters. The prints, the objects, the negative space, they all work together to tell a story.
How to Decorate a Narrow Shelf: The Foundation
Start by clearing your shelf completely. You can't plan a strong layout if you're working around what's already there. A blank slate forces you to think intentionally about every piece.
Next, identify your anchor piece. This is usually your largest or most eye-catching item.
Measure your shelf depth carefully. Know exactly how much space you're working with. This measurement determines what frames will work and how objects can lean or layer.
Consider the shelf's length too. A 24-inch narrow shelf needs a different approach than a 48-inch one. Shorter shelves work best with 2-3 key pieces. Longer shelves can handle more complexity.
Think about your color story before you add anything. Will your prints and objects share a cohesive palette, or will you use contrast? Decide this upfront. It makes every placement decision clearer.
Choosing the Right Frame and Print Size for Your Shelf Depth
Narrow shelves punish guesswork. A frame that looks fine in the store can tip, overhang, or hide your print once it is leaning at an angle. The fix is to choose the print and frame as a single system sized to your shelf's actual depth, not to the wall it will sit against.
Measure the shelf, then measure the lean
Take four measurements before you buy anything:
- Usable depth: from the wall to the front edge of the shelf, minus any lip or trim. A shelf listed as 6 inches deep may only give you 5.5 inches of flat surface.
- Clearance height: from the shelf surface to the bottom of the shelf above, or to the ceiling if there is no shelf above.
- Shelf length: wall to wall or bracket to bracket.
- Wall angle: hold a level against the wall. Older walls often lean slightly, which changes how far a frame's top edge travels when it leans back.
A leaning frame consumes more depth than its profile suggests. When a frame of height H leans back at angle θ from vertical, its footprint on the shelf is approximately H × sin(θ). At a 15-degree lean, a 12-inch-tall frame eats about 3.1 inches of depth; at 20 degrees, about 4.1 inches. Add the frame's own profile depth (typically 0.5-1.5 inches for thin profiles) and you have the true footprint. That number, not the frame's listed size, is what must fit inside your usable depth with a safety margin.
A depth-based decision guide
Use your usable depth to narrow the options before you shop:
- Under 4 inches: choose unframed prints on rigid board, thin metal frames, or float-mount frames that sit close to the wall. Keep frame heights at 8-10 inches and lean angles at 10-12 degrees. Skip deep shadow-box frames and thick mats.
- 4-6 inches: most thin-profile frames (0.5-1 inch deep) work at 12-15 degrees with heights up to about 12 inches. A single 2-inch mat is fine; double mats start to add visual and physical bulk.
- 6-8 inches: you can layer two frames or use a moderate frame profile (1-1.5 inches) with a mat. Heights up to 14 inches are workable at 15 degrees.
- Over 8 inches: treat it like a shallow standard shelf and use the layering techniques elsewhere in this guide.
Width follows a similar logic. On a shelf under 30 inches long, one print using 40-50% of the length plus one small object reads as complete. On longer shelves, work in zones of 18-24 inches and keep each zone's art footprint under about 60% of the zone width so negative space survives.
Frame profile, mat, and glazing trade-offs
Every component adds depth or weight, and on a narrow shelf both matter:
- Frame profile: thin metal or narrow wood profiles (0.5-1 inch face, 0.5-1 inch depth) project the least. Wide gallery frames and deep shadow boxes are the first things to cut.
- Mat: a mat adds visual breathing room around the print but also increases the frame's outer dimensions. On a narrow shelf, a 1.5-2 inch mat is usually the sweet spot; skip double mats unless the shelf is at least 6 inches deep.
- Glazing: acrylic glazing is lighter than glass, which matters when a frame is leaning rather than hanging. Glass gives sharper clarity but adds weight and shatter risk near the shelf edge.
- Backing and hardware: sawtooth hangers and easel backs add depth. Remove easel backs or fold them flat when leaning, and check that any hanging hardware does not protrude past the frame's back plane.
Test-fit before you commit
Before removing tags or ordering multiples, do a dry fit. Lean the candidate frame at your intended angle, confirm the footprint stays inside the usable depth with at least a half-inch of margin, and step back three to four feet. The frame should read as a deliberate object, not as something squeezed onto the shelf. If it disappears at that distance, it is too small for the shelf's visual weight; if it crowds the edges, it is too large. Buy the second and third frames only after the first one passes this test.
How to Display Small Art Prints Without Creating Visual Clutter
The biggest mistake with narrow shelves is trying to fit too much. Clutter happens when you add pieces without a clear visual plan.
Start with your anchor print. Place it in a position of visual weight, often slightly off-center or toward one end. This creates natural balance and draws the eye.
Leave negative space. Empty space is not wasted space. It's what makes your arrangement readable.
Limit your color palette. Use no more than three main colors across your prints and objects. This creates cohesion and prevents the shelf from feeling chaotic.
Group related items. If you're using books, stack them together. If you have plants, cluster them in one area. Grouping creates visual order and prevents scattered, cluttered feelings.
Stand back frequently. Step away from your shelf and look at it from across the room. What reads? What feels off?
Layering Framed Art on Shelves for Visual Interest
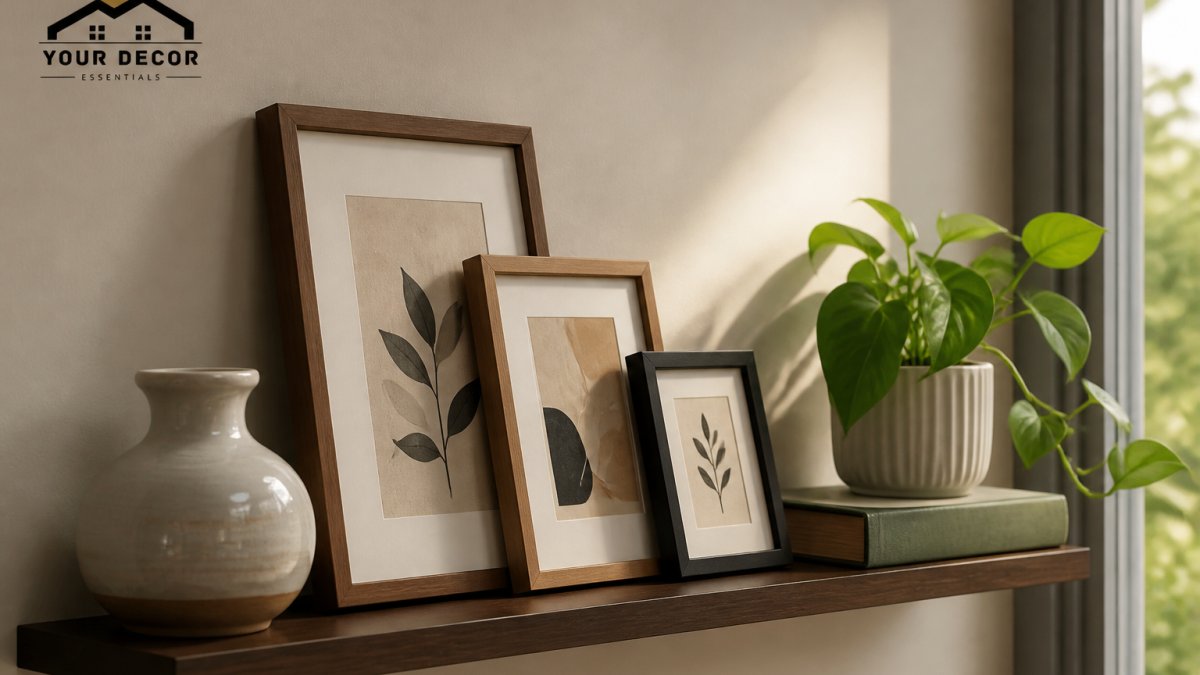
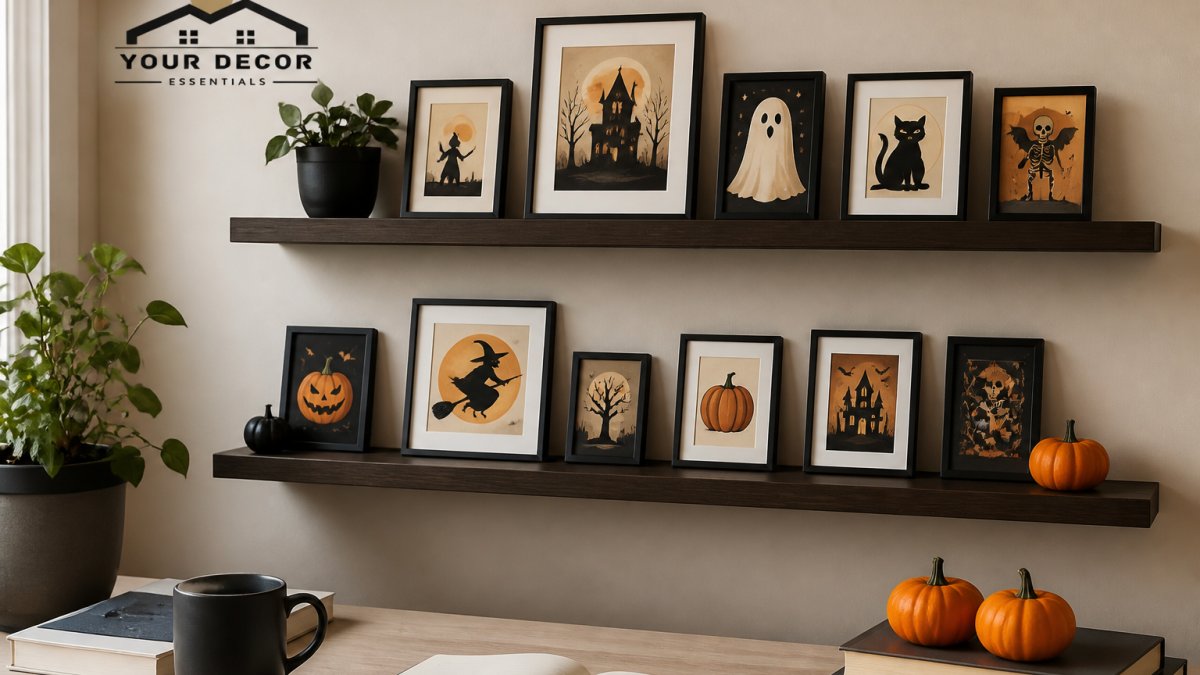
Layering is the secret technique for narrow shelves. It's how you create visual depth when physical depth is limited. Layering means positioning pieces at different angles and heights so they interact with each other rather than sitting in a flat line.
Start with your largest piece. This becomes your backdrop. Lean it against the wall at a slight angle, about 15-20 degrees. This creates an immediate sense of depth and breaks the static feel of a straight-on display.
The Leaning Technique for Maximum Impact
Leaning artwork is not casual or temporary. It's a deliberate styling choice that works beautifully on narrow shelves. When done right, leaning creates movement and prevents your display from feeling stiff.
Lean your primary print toward the back of the shelf. It should rest against the wall or lean on the back edge. A 15-20 degree angle is ideal. Too steep and it looks unstable. Too shallow and it doesn't create enough visual interest.
Add a second piece in front of the first. This piece can lean forward slightly or stand upright. The contrast between the two angles creates depth. The front piece should be smaller than the back piece, so both prints remain visible.
For narrow shelves, never stack frames directly on top of each other. This wastes depth and creates a flat appearance. Instead, offset them horizontally and at different angles.
Creating Depth Through Overlapping and Positioning
Overlapping is the key to making small art prints narrow shelves work visually. When pieces overlap slightly, they appear closer together while actually using less total space.
Position your second frame so it overlaps the first by about 1-2 inches. This creates a layered effect without requiring more shelf real estate. The overlap makes the eye move across the arrangement rather than stopping at individual pieces.
Use height variation to enhance the layered effect. A leaning frame naturally creates height variation. A standing frame adds another level. This vertical movement makes the arrangement feel dynamic.
Introduce a third element, a plant, book, or vase, that sits in front of or beside your prints. This object should be smaller than your frames but visually interesting. It breaks up the rectangular shapes of the prints and adds organic texture.
Picture Ledge Styling Ideas: Balancing Art with Objects
Picture ledges are shallow shelves designed specifically for displaying art. They're narrower than standard shelves, which means you need to be even more intentional with your styling.
On a picture ledge, your prints should be the primary focus. Secondary objects should be minimal and small. Think a single small plant, a thin decorative book, or a small sculptural object.
Lean one or two prints against the wall. Leave significant negative space around them. Picture ledges work best when they feel curated and minimal, not crowded.
Use the ledge's width strategically. A 24-inch ledge can hold 2-3 small prints comfortably. A 36-inch ledge can handle 3-4. Anything more starts to feel cluttered on such a shallow surface.
Add texture with a single accent object. A small vase, a curved sculpture, or a meaningful book adds visual interest without overwhelming the ledge.
Using Height Variation and Shapes to Add Visual Balance
Height variation is how you create visual interest on a narrow shelf. When everything sits at the same level, the display feels flat and boring.
Use leaning frames to create height naturally. A frame leaning at 15-20 degrees is taller than one standing upright. This height difference draws the eye and creates movement.
Add objects of different heights. A tall plant next to a short vase creates visual rhythm. A stack of books next to a single frame breaks monotony.
Mix shapes intentionally. Rectangular frames paired with curved vases and round plants create visual interest. Straight lines next to organic shapes feel balanced and sophisticated.
Create a visual flow by varying heights in a pattern. You might go tall, short, medium, short, tall. This rhythm guides the eye across the shelf and makes the arrangement feel intentional.
Keeping Your Narrow Shelf Display Stable and Safe
On a narrow shelf, stability is not a finishing touch, it is a design constraint. A frame that leans at 15 degrees has most of its weight behind its base, and a shallow shelf gives that base very little room to recover if it slips. The goal is to make every piece resist sliding, tipping, and scuffing without permanent hardware.
Why leaning frames slip, and how to stop it
A leaning frame contacts the shelf along its bottom edge and the wall along its top edge. Friction at those two lines is all that holds it. Smooth shelf finishes, glossy paint, and lightweight frames all reduce that friction. Three low-cost fixes work together:
- Increase base friction: place a thin strip of non-slip shelf liner or a small piece of felt under the bottom edge. This raises the coefficient of friction without adding visible height.
- Anchor the top edge: a small piece of removable mounting putty or a clear adhesive dot between the frame's top back edge and the wall stops the top from creeping sideways. Keep it small so it does not mark paint.
- Reduce the lean angle: a 10-12 degree lean is more stable than 20 degrees and uses less depth. If a frame feels tippy, the first fix is almost always to stand it more upright.
Protect the wall and the frame
Leaning frames scuff walls at the top contact point and can scratch shelf surfaces at the base. Prevent both:
- Wall side: apply a small felt pad or a strip of low-tack painter's tape at the top back edge where it meets the wall. Felt pads designed for furniture feet work well and are removable.
- Shelf side: felt or cork pads under the bottom edge protect both the frame finish and the shelf.
- Frame back: check that hanging hardware, easel backs, and staples are flush. Anything protruding becomes a pressure point that concentrates weight and can crack glazing.
Securing displays in homes with children and pets
A narrow shelf at hip height or below is within reach of toddlers and cats. The most reliable approach is to make the display either too heavy to disturb or physically restrained:
- Museum putty at both contact lines: a pea-sized amount at the base and a smaller amount at the top edge holds lightweight frames against casual bumps.
- Removable adhesive strips: products rated for picture hanging can anchor a frame's back to the wall without nails. Follow the manufacturer's weight rating and cure time.
- Bookend or object bracing: a heavy book or a weighted object placed at the end of a leaning frame acts as a physical stop. This is simple and renter-friendly.
- Keep the front edge clear: never let a frame or object overhang the shelf edge. On a narrow shelf, an overhang is the single most common cause of a fall.
Rental-friendly, no-drill options
Renters can get a layered look without permanent changes:
- Use removable adhesive strips rated for the frame's weight instead of nails or screws.
- Choose freestanding picture ledges that rest on the shelf or are held with tension, rather than wall-mounted ledges.
- Use felt and putty rather than screws to stabilize leaning frames.
- Keep a small inventory of removable hooks and strips so you can reconfigure without patching walls.
A weekly two-minute check
Shelves settle, adhesive ages, and objects shift. Once a week, push each frame gently at the top corner, confirm the base is still inside the shelf edge, and replace any putty that has dried or lost tack. This routine catches the slow failures, creeping frames, loosening adhesive, and scuffed walls, before they become damage.
Step-by-Step Layout Examples for Different Shelf Lengths
For a 24-inch narrow shelf:
- Place your largest print leaning against the wall, slightly left of center
- Add a smaller print in front, leaning slightly forward, overlapping the first by 1-2 inches
- Position a small plant or vase on the right side
- Leave the far left empty for negative space
This creates a balanced arrangement that uses about 60% of your shelf space, leaving room for the eye to rest.
For a 36-inch narrow shelf:
- Create a grouping on the left: leaning print, smaller print in front, small object
- Leave 6-8 inches of negative space in the middle
- Create a second grouping on the right: a single tall frame leaning, a small sculptural object beside it
- Leave the far right empty
This arrangement creates two focal points with breathing room between them.
For a 48-inch narrow shelf:
- Left section: three prints in a layered arrangement with one small object
- Center: 8-10 inches of empty space
- Right section: two prints with a plant or vase
- Far right: negative space
Longer shelves work best when you create distinct zones rather than one continuous arrangement. Each zone should feel complete on its own.
Frequently Asked Questions
How do you keep a narrow shelf from looking cluttered when displaying small art prints?
Limit your display to 3-5 key pieces and leave negative space around them. Choose prints in a cohesive color palette, and balance framed art with just one or two meaningful objects like a small plant or vase. Vary the heights and angles of your frames to create visual interest without overwhelming the narrow space. Step back frequently while styling to assess the overall balance.
What size art print works best on a narrow shelf?
Small art prints (4x6 inches to 8x10 inches) typically work best on narrow shelves because they don't dominate the limited depth. Measure your shelf depth first, if it's less than 6 inches, choose frames no thicker than 1 inch. Prints should be proportional to the shelf length; a 24-inch shelf can hold two to three small framed prints comfortably without feeling crowded.
How do you layer framed art on a picture ledge effectively?
Lean one frame forward at a slight angle and position a second frame behind it, slightly higher and offset to the side. This creates depth and visual interest while keeping both pieces visible. Add a small decorative object (plant, book, or vase) to one side to anchor the arrangement. The key is ensuring nothing blocks the view of the artwork and the shelf remains stable.
Can you lean framed art against a wall on a narrow shelf, and is it safe?
Yes, leaning artwork is a popular styling technique for narrow shelves. To keep it safe, ensure frames are lightweight and the shelf is level. Use non-slip shelf liners or felt pads underneath frames to prevent sliding. Avoid leaning heavy or oversized frames, and never stack more than two pieces on top of each other. Test the stability by gently nudging the display before considering it complete.
Styling small art prints on narrow shelves transforms what feels like a limitation into an opportunity for creative display. The constraint of limited depth forces you to be intentional about every choice. Your Decor Essentials offers curated prints and decorative objects designed to work beautifully in tight spaces. Shop our collection of small framed art, sculptural accents, and meaningful objects that bring visual interest to any narrow shelf in your home.